The festive season is unmatched - and it’s not just because your home often looks its very best at this time of year.
In terms of annual leave, it’s an excellent time of year to consider laying that decking project you’ve been considering for the past few months! Especially if you’re lucky enough to work for a business that has a Christmas/New Year shutdown.
So, if hanging outdoor lights or adding reindeer to your roof simply won’t cut it this year, NWTT reveal how easy and simple it is to create a beautiful deck suitable for winter hot-toddies around the fire.
It’ll be top of all your neighbours' Christmas lists once they’ve seen yours!
What you’ll need to build a Christmas deck
To get the best possible results, you’ll need a few essentials before you get started, including:
Timber and fixings
- Treated timber joists - 47x100mm, 47x150mm or appropriate size. Ensure timber is strength-graded and treated for ground contact if used on or near soil
- Decking boards (softwood or composite)
How much decking do I need? This depends on the size of your deck, so feel free to contact the team for advice! Composite decking boards may require tighter joist spacing (300 - 400mm centres) to prevent sagging. - Post supports or concrete anchors
- Exterior wood screws
Use galvanised or exterior-rated screws for durability - Joist hangers
Weed membrane
Tools
- Tape measure and pencil
- Spirit level
- Saw
- Drill/driver
- Hammer
- String line
- Protective gloves and goggles
- Set square - sometimes called a combination square
Step 1: Plan the deck
Before you get going, you’ll need to measure your garden space and decide on the size and shape deck you would like.
A rectangular or square deck will be the simplest option, so it is best for beginners, but you can consider a round deck if you have more experience.
You should think about the following as part of the planning process:
- How close to the house the deck will be
- How it will be accessed - will people step onto it from the back door, or will it be separate?
- How much weight it will need to support - adding elements like brick BBQs or fountains will raise the weight considerably
- Drainage and ground conditions of your garden
To help you plan, why not sketch your garden with the deck in position? This can also give you an excellent place to add frame dimensions and measurements.
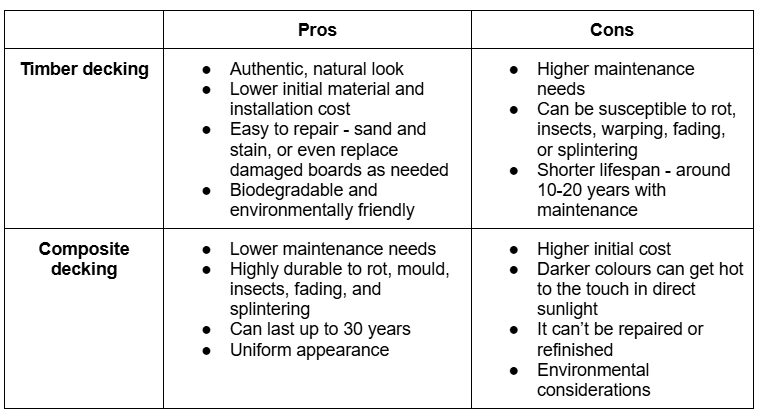
Decide on timber or composite decking
While the choice is up to you, it’s important to make the decision between timber decking and cladco composite decking. Doing so early allows you to be fully prepared and have everything you need when it comes to installation day!
Step 2: Prepare the ground below
It’s important to create a stable, level base - this will give your deck the best foundation. Do this by:
- Clearing away grass, stones, and debris
- Levelling the area
- Laying a weed membrane (as per the manufacturer's instructions) to prevent unwanted and unsightly growth
- Add a thin layer of gravel for drainage
If you are raising the deck, ensure posts have firm foundations of gravel or concrete to a minimum depth of 600 - 900 mm. Similarly, if you are building over concrete or a pre-existing patio, use adjustable supports or timber sleepers instead of digging into the soil.
Step 3: Build the decking frame
Like your skeleton, the decking frame supports the body of the deck and keeps it all in its proper position. For this reason, it’s paramount that this bit is secure, stable, and correctly set up.
Lay out your perimeter joists
Create a rectangle or square using the cut lengths. Before fixing them into place, ensure all corners are exactly 90° - a set square will help with this.
Fix internal joists
Fix these joists at 400-600mm centres, depending on your decking board requirements. If using composite or heavier timber boards, you may need to allow for 300-400mm spacing for extra support.
Before fixing them in place, don’t forget to check that they are all level using your spirit level!
Once you are sure they are in the right place, secure any connections with screws, joist hangers, or coach bolts - depending on the type of decking you are using.
Add support posts for raised decks
If relevant for your project, use treated posts that are set in concrete or metal post anchors to ensure the deck is level and firmly installed.
To prevent water pooling and rot, posts should be set below the frost line and include drainage gravel.
Step 4: Fix the frame in place
Once complete, it’s time to position your frame in place. To ensure it is securely held in place, you should complete the following before screwing it in:
- Check the level in all directions
If it is uneven, you can use raisers or packers to correct this now.
- Screw the frame into the deck posts or anchors for total security and peace of mind
If you prefer or are installing a very large deck, you can also add diagonal bracing at this point.
Step 5: Fit the decking boards
This is the most exciting stage, as it all starts to come together really quickly now!
Start with the outer edge
Your first board should always be flush with the frame to ensure clean lines across your deck and a more impressive, professional finish.
Use spacers or off-cuts
There should be a 4-6mm expansion gap between boards to allow for weather-related movement throughout the seasons.
It’s best to prepare more spacers than you think you’ll need and have a good stock so you can use them generously, for the best finish.
Fix each board securely
To get the best connection, we recommend:
- Pre-drilling holes to reduce the likelihood of splitting or board damage
- Use two screws per joist, crossing for extra stability
- Keep screws neatly aligned for a better finish
- Treat the cut ends of timber boards (if relevant) to protect against moisture damage and rot
Continuing in this manner, be sure to step back and check your progress every few boards. Likewise, ensure your deck doesn’t become waterlogged by angling the deck away from the house, at around 1-2°.
Step 6: Decorate and enjoy
The festive period is renowned for outdoor lights and accessories - it fills the hearts of passers-by and keeps the dark nights slightly less ominous.
A finished deck becomes a magical backdrop for your holiday celebrations, so why not add:
- Rope lighting around the edges of the deck
- On-deck lights, like free-standing light-up characters
- Add lanterns, heaters, or a fire pit
- Decorate an outdoor tree to make an external Christmas tree
The options are endless!
Create your Christmas deck this winter
Cool weather is ideal for laying decking, as it is good for timber. As such, although chilly, winter might be the best time to get your dream deck laid!
For advice on materials, what you need to complete the job, or if you can’t decide which decking type is right for you, feel free to contact the friendly family team at NWTT. Email [email protected] or call 01942 720 777, and we’ll help however we can